PDF Proofreading Marks

Digital editorial markup

PDF Proofreading Marks allow you to use traditional editorial marks in a digital workflow.

PDF Proofreading Marks are a great complement to annotations/comments in Adobe Acrobat. All proofreading marks show in the ‘Comments List’ and can be checked off when taken in, as shown below.
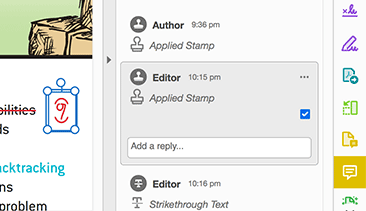
Proofreading marks can be checked off when taken in.

The benefit of using PDF Proofreading Marks is that you can quickly visualise changes, which you can’t do with annotations or comments alone.

Case study

Nikki M Group worked with an editorial team who implemented PDF Proofreading Marks on Signpost Mathematics, a series consisting of 18 titles. The entire production process was electronic with all corrections marked up in PDF files. This process saved paper, printing costs, delivery expenses and time.

Installation instructions

The following steps will load PDF Proofreading Marks into Adobe Acrobat.

Quit Acrobat if it is open.
Download and place the file pdf-proofreading-marks.pdf in your Acrobat ‘Stamps’ folder.
Note: The location of the ‘Stamps’ folder will vary depending on your Acrobat version and operating system. For example:
Mac OS X
/Users/USERNAME/Library/Application Support/Adobe/Acrobat/DC/Stamps
The ‘Library’ folder can also be found using the ‘Finder’ menu ‘Go > Go to Folder…’ and entering ‘~/Library’.
Windows 10
C:\Users\USERNAME\AppData\Roaming \Adobe\Acrobat\DC\Stamps
If the ‘AppData’ folder isn‘t visible, go to the ‘View’ menu in ‘File Explorer’ and make sure the ‘Hidden items’ option is ticked.
Restart Acrobat
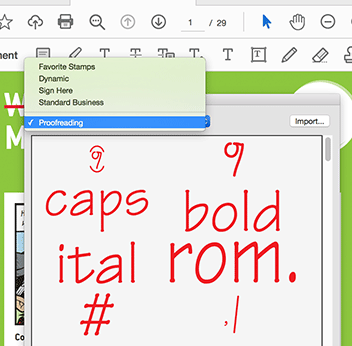
PDF Proofreading Marks will be available in the ‘Stamps Palette’.

Pro Edition

Professional PDF Proofreading Marks

How does it work?

Using PDF Proofreading Marks

Once you have installed PDF Proofreading Marks in Adobe Acrobat the following steps will show you how to apply the marks in a PDF file.

Open the PDF file you want to edit and click on the ‘Comment’ icon in the ‘Sidebar’.
Select 'Comment' from the 'Toolbar'.
Locate the ‘Add stamp’ icon in the 'Comments' toolbar.
Locate the 'Stamp' icon.
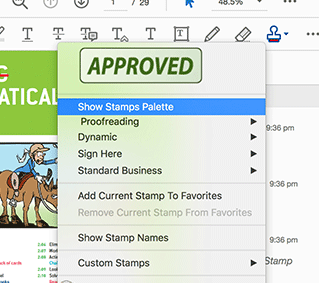
Click the ‘Add stamp‘ icon and choose ‘Show Stamps Palette‘.
Click the ‘Stamp‘ icon and choose ‘Show Stamps Palette‘.
Select ‘Proofreading’ from the dropdown menu.
Click on a proofreading mark you want to use and then click on your page.
The mark will appear on the page for you to move into position.

Disclaimer

While Nikki M Group Pty Ltd has made every effort to create PDF Proofreading Marks as a useful tool, we do not guarantee that it is free from defects. PDF Proofreading Marks is provided ‘as is’, and you use it at your own risk. We make no warranties as to performance, fitness for a particular purpose, or any other warranties whether expressed or implied. No oral or written communication from or information provided by Nikki M Group shall create a warranty. Under no circumstances shall Nikki M Group be liable for direct, indirect, special, incidental, or consequential damages resulting from the use, misuse, or inability to use PDF Proofreading Marks, even if Nikki M Group has been advised of the possibility of such damages.

Guide for using proofreading marks

Download our guide Using proofreading marks to see a full list of symbols for correcting proofs.


List of proofreading marks with examples. Image shows how proofreading symbols are used to markup editorial corrections.

Video tutorials

How to install on a Mac

How to install on Windows

Tips for getting started

Six tips for getting started when using Adobe Acrobat to markup a PDF file with comments and proofreading marks.

  1. Changing your login name displayed in comments.
  2. Show checkbox in comment notes.
  3. Make font size bigger in comments.
  4. Add marquee zoom to your toolbar.
  5. Seeing what proofreading marks are called.
  6. Using our proofreading marks guide to editorial symbols.